We’re excited to introduce InData 3.0 and its plethora of new, Pro-level features including support for anchored text, groups and, wait for it … tables!
Introducing InData Pro
InData Pro — InData 3 enabled with a new Pro-level license — adds a long-awaited set of features that finally unlock the full publishing power of Adobe InDesign, with support for anchored/inline everything including text frames, groups, text on a path, and, yes, tables.
Here’s a quick walk-through of some of the major new features in InData Pro.
(Expand to full-screen for best viewing.)
With these great new features, you can really build just about anything that InDesign can handle, from a simple directory to the most complex flowing layouts. If you’d like to take InData Pro for a test drive, start by downloading and installing InData 3. Then:
-
If you already have an InData license, contact us using InData > Contact Support with the body text “Requesting a Pro trial” and we’ll set you up with a trial. (This is the only way we can do it given how our licensing system works. Note that we can only respond to email requests started by InData > Contact Support.)
-
If you don’t have an InData license, just fire up InDesign with InData 3 and start your free trial using InData > About > License. All of the new Pro features will be fully enabled for the 15-day trial.
Changes
-
Adds support for anchored text frames. (Pro only)
Anchored text frames may contain sub-prototypes which, like the main prototype, can be made of any sequence of literal text, anchored frames, and InData statements. Statements in a sub-prototype have access to the current value of all fields and variables set in the main prototype, can modify those values, and can even add new variables. A sub-prototype in an anchored text frame does not have access to frames outside its frame; anchored frame numbering within a sub-prototype always restarts at 1 (for
«set filename of picture 1», for example).Pro tip: Consider editing sub-prototypes in the InDesign Story Editor since a prototype can easily overflow its anchored text frame.
Like picture frames, text frames are numbered by their position within the prototype and their content can be set with a similar
«set filename of textframe n to source»statement. Text is placed in the anchored frame just as if InDesign’s File > Place had been used such that, for example, an updatable link is created if InDesign’s Create Links When Placing Text and Spreadsheet Files setting is enabled (which makes it entirely compatible with Em’s WordsFlow and DocsFlow plug-ins.)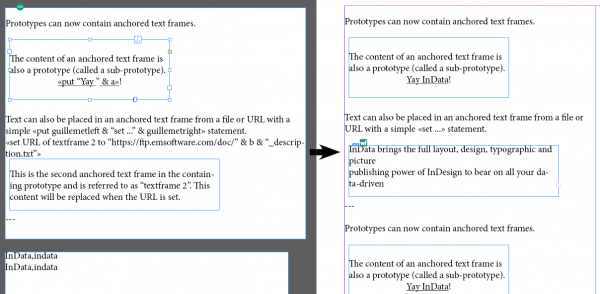
A prototype with anchored text frames and its output. -
Adds support for anchored container frames and frames of any shape (lines, curves, ellipses, etc.).
-
Adds support for type on a path. (Pro only)
If any anchored item (text, picture, line, curve, etc.) in a prototype has type on a path, its type is treated as a sub-prototype just like a regular text frame’s (see anchored text frames, above). Unlike a text frame, type on a path cannot currently be set with a
«set filename of textframe n to source»statement.
A prototype with anchored type on a path and its output. -
Adds support for anchored groups. (Pro only)
Groups that are anchored in a prototype can contain any combination of frames and content. Picture and text frames that are members of a group are numbered from back-most to front-most so that their content can be set from the group’s containing prototype with a
«set filename of picture n...»statement.
A prototype with a chaotic anchored group and its output. -
Adds support for tables. (Pro only)
Tables of any size can now be generated during an InData import by including table “fragments” (tables with one row, or just a few rows) directly in the prototype. A table fragment is just a regular InDesign inline table in which each text cell may contain an InData sub-prototype. A table is inserted into the generated text whenever a table fragment is encountered during the import.

A single-row table fragment. The first table fragment encountered in the prototype begins a new table and is used as the template for that table. The resulting table shares all of the properties of the template fragment including table width, number of columns and column widths, table style, and column and row styling. Once created, this new table becomes the “current” table.
Rows from subsequent table fragments are added to the current table so long as they share the same number of columns. In this way, large tables can be built from individual records in the input data. Each fragment’s row properties (like its Keep with Next Row setting) are preserved when added to the current table.
The current table is ended when something other than a table fragment (such as a run of characters or an anchored frame) is output by the prototype. It’s also ended when InData encounters a table fragment with a different number of columns. If the column counts differ, a new table based on the new fragment is immediately started and becomes the “current” table.
Text cells in tables may contain sub-prototypes which, like the main prototype, can be made of any sequence of literal text, anchored frames, and InData statements. Statements in a sub-prototype have access to the current value of all fields and variables set in the main prototype, can modify those values, and can even add new variables. A sub-prototype does not have access to frames outside its hosting cell; anchored frame numbering always restarts at 1 (for «set filename of picture 1», for example) within a cell.
Text cells are numbered along with regular text frames, can be addressed by their index within the prototype, and can therefore have their content set with a
«set filename of textframe n to source»statement. Text cells are numbered left-to-right and top-to-bottom within a table. For example, if three anchored text frames precede a one-row table fragment, then the fragment’s first text cell will be index 4, its second 5, and so on.Likewise, picture cells are numbered with picture frames. Their content can be set using a
«set filename of picture n to source»statement in the containing prototype. Picture cells are also numbered left-to-right and top-to-bottom within a table.
Content can be placed in table cells with «set filename…». A picture cell may contain an InDesign QR code. If a QR code’s settings are connected to InData variables, the cell’s image will be generated “live” during the import.
Text and picture cells can also carry InCatalog links that can then be used to later update their content with InCatalog.
Table fragments can contain header and footer rows. These special rows are added to the current table when they’re encountered (they don’t have to be in the starting fragment).
Table fragments can contain merged cells. Since merging cells horizontally in a single-row table can change the underlying column count and prevent the fragment from being joined with the current table, an extra row — a “dummy” row — can be added to lock the fragment’s original column count. To be seen as a dummy, the row must be completely empty (contain no text or pictures). Dummy rows are ignored by InData and are never added to the current table.

Add an empty row to preserve a table fragment’s column count. To demonstrate, let’s update InData’s timeworn Car Parts sample (discussed in the InData User’s Guide on page 105) to use tables.

The original sample used carefully spaced tabs and rules above for subheads. Starting with the original sample, we insert a five-column-one-row table in the prototype that will becomes body rows in the imported table. We move each field statement into its corresponding column and remove the tab characters since they’re no longer needed. We then use the Cell Options dialog to adjust the look of the row, position content within each cell, and set the Row Height to be at least 14pt.

A five column table fragment with a sub-prototype for each cell. Note that for this sample, we know that a subhead is always output before any body rows. That means that this body row fragment is never used to start a table, so its cell widths and overall width will be never be used. That’s why we’re able to widen each cell to make its content easier to edit.
Next, we insert a two-row-five-column table to replace the original sample’s rules-based subhead. Since this fragment will be output first, InData will use it as the template fragment for the generated table’s styling, overall width, column count, and column widths. We create the subhead row by setting the first row’s leftmost cell’s fill color to Black in Table > Cell Options > Strokes and Fills, moving the white colored
«char 2 to 500 of partno»statement into it, and selecting all of first row’s cells and choosing Table > Merge Cells.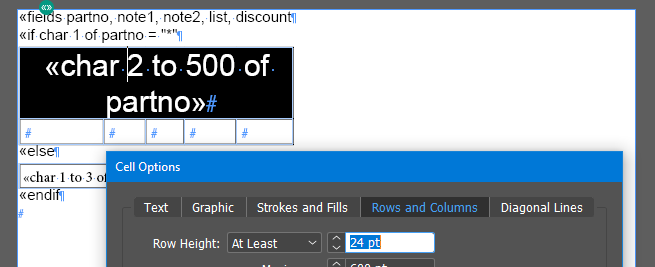
The table fragment with the subhead also determines the columns’ widths. Notice how InDesign auto-grows the row’s height when the prototype is pasted in. We definitely don’t want the subhead to be two lines high in the final table! To fix this, set the Row Height in the Table > Cell Options > Rows and Columns panel to “At Least” 24pt (see screenshot, above). With this setting, the row will always start with a 24pt height and only auto-grow if it needs to.
The second row of this table fragment, which we leave completely empty, plays two important roles. The first is as a “dummy” row, where it prevents InDesign from collapsing the table to a single column when we merged the first row’s cells. It’s important that this table fragment has five columns so that InData will add body row fragments, which have five columns, to it. (As stated above, InData only ever joins table fragments that have the same number of columns.) This dummy row will be detected and ignored by InData during an import; InData never adds a dummy row to the current table. (And the dummy row cells aren’t included in any text/graphics cell numbering.)
The second row’s other important role is as the column widths template, in which it provides the generated table’s column widths.
And that’s it! We run the sample by placing the text cursor in the page’s main text frame and selecting InData > Import from Pasteboard. InData processes the prototype, imports the data, and generates a single, continuous, five-column table in the main story (shown here flowing through multiple columns).

Et voilà! A single, continuous table. Pro tip: Editing sub-prototypes in table cells is best done in the InDesign Story Editor, which allows you to view and edit the entire cell contents no matter what size the formatted cell has in the layout view (which is often quite constrained).
Actually, editing whole prototypes is often best done in the Story Editor, since prototypes are often much larger than their layout containers.
-
Adds the constants
columnbreak,framebreak,pagebreak,oddpagebreak, andevenpagebreakas convenient aliases for InDesign’s various break “characters” presented in the Type > Insert Break Character menu. These special characters behave like any other character when working with strings. For example, a Frame Break character can now be inserted with a simple«put framebreak»statement (instead of needing to resort to tagged text like«put styled indesigntagged "<cnxc:Box>"»), put into a variable like«put framebreak into mytext», or combined with other text like«put "some text" & framebreak & "some other text" into mydescription». -
Adds the constants
forcedlinebreakanddiscretionarylinebreakas handy shortcuts for InDesign’s line break characters found in the Type > Insert Break Characters menu. For example, a Forced Line Break character can now be inserted with a simple«put forcedlinebreak»statement instead of with tagged text or the numtochar() operator. -
Adds Excel number scaling to the
format()function. To scale a number by a multiple of 1000, include a comma at the end of the number format. Each additional comma scales the number by another 1000. For example, to produce"18"from"18000"use the format"#,", and to produce"18.1"from"18100000"use the format0.0,,. This change means that only commas within digit placeholders (like#,###) now trigger a thousands separator. -
Changes the
format()function to treat an empty format parameter as Excel’s General (default) number format ("#.##") so that a use likeformat("1234","")produces"1234"instead of""(an empty string). -
Changes the
format()function’s negative sign handling to work like Excel’s so that a negative sign is always displayed for a negative number unless a<NEGATIVE>section is provided in the number format. A negative sign in the number format is now treated as a literal. -
Changes the
format()function to pass through non-numeric “numbers” as literal text rather than ignoring them. -
Fixes a problem that was causing files specified relative to the user’s home folder (POSIX-style paths like “~/Documents/mypic.jpg”) to not be found.


